10 Upcycled Clothing Ideas For Men

Upcycled clothing for men offers an eco-friendly approach to wardrobe customization by transforming outdated or worn-out garments into practical, stylish pieces. Upcycling involves taking existing textiles, such as old button-down shirts, denim jeans, and oversized sweatshirts, and altering their construction to create new functional apparel. Readers will learn practical techniques for cutting, sewing, and reassembling discarded garments into fresh, wearable items. This comprehensive guide provides step-by-step instructions for ten unique beginner-friendly projects that require minimal supplies and basic crafting skills. Understanding these upcycling principles is useful because it reduces textile waste, lowers personal clothing expenses, and allows individuals to develop tailored, one-of-a-kind wardrobe items. By applying structured alteration methods, anyone can refresh their clothing collection while building valuable sewing capabilities through creative, sustainable hands-on projects.
Why This Idea Is Trending or Useful
Upcycled menswear is gaining significant momentum across digital lifestyle spaces due to its blend of sustainability, cost-effectiveness, and unique aesthetic value. Modern consumers increasingly prioritize environmentally conscious choices, making handmade textile alterations a popular alternative to fast fashion. Upcycling provides practical value by giving durable fabrics, like heavyweight denim and canvas, a secondary lifecycle instead of discarding them. From a design perspective, remade garments align naturally with modern minimalist style trends and vintage workwear aesthetics. These creative projects have strong appeal because they allow crafters to customize fits, combine textures, and experiment with functional organization without spending money on raw fabric. Furthermore, these techniques are beginner friendly, requiring only basic tools like scissors, pins, and standard sewing machines to achieve clean, professional results.
Materials and Preparation
Proper preparation ensures clean structural cuts and seamless construction when transforming old menswear into new garments. Start by gathering worn-out garments such as relaxed-fit denim jeans, plaid flannel shirts, ribbed sweaters, graphic tees, and sturdy cotton work jackets. Essential tools include a pair of sharp fabric shears, a seam ripper, measuring tape, tailor’s chalk, safety pins, and a reliable sewing machine with appropriate needle sizes for heavy fabrics. Before beginning any project, thoroughly wash and iron all donor clothes to preshrink the fibers and ensure accurate measurements during layout. Carefully map out your cutting lines using chalk, taking note of original seams, hem edges, and pockets that can be repurposed in the new design. Proper advance planning minimizes fabric waste, keeps structural lines straight, and guarantees a smooth crafting process from start to finish.
1. Denim Jacket Sweatshirt Sleeve Hybrid
Step-by-Step Guide
The denim jacket sweatshirt sleeve hybrid combines the sturdy torso structure of a classic denim jacket with the flexible comfort of fleece hoodie sleeves. Select a fitted denim jacket and an oversized heavy cotton hoodie, ensuring the colors contrast nicely, such as medium-wash indigo denim paired with heather grey fleece. Use a seam ripper to carefully detach the rigid denim sleeves at the armhole seams, preserving the original armhole binding on the jacket body. Next, cut the fleece sleeves off the hoodie, leaving a one-inch seam allowance around the top shoulder curve for proper fit adjustment. Insert the fleece sleeves into the open armholes of the denim jacket, pinning the right sides together while matching the bottom underarm seams precisely. Sew around the armhole circle using a strong straight stitch, then finish the exposed fabric edge with a zigzag stitch to prevent fraying and provide long-lasting durability.

2. Flannel Shirt Contrast Pocket Utility Vest
Execution Process
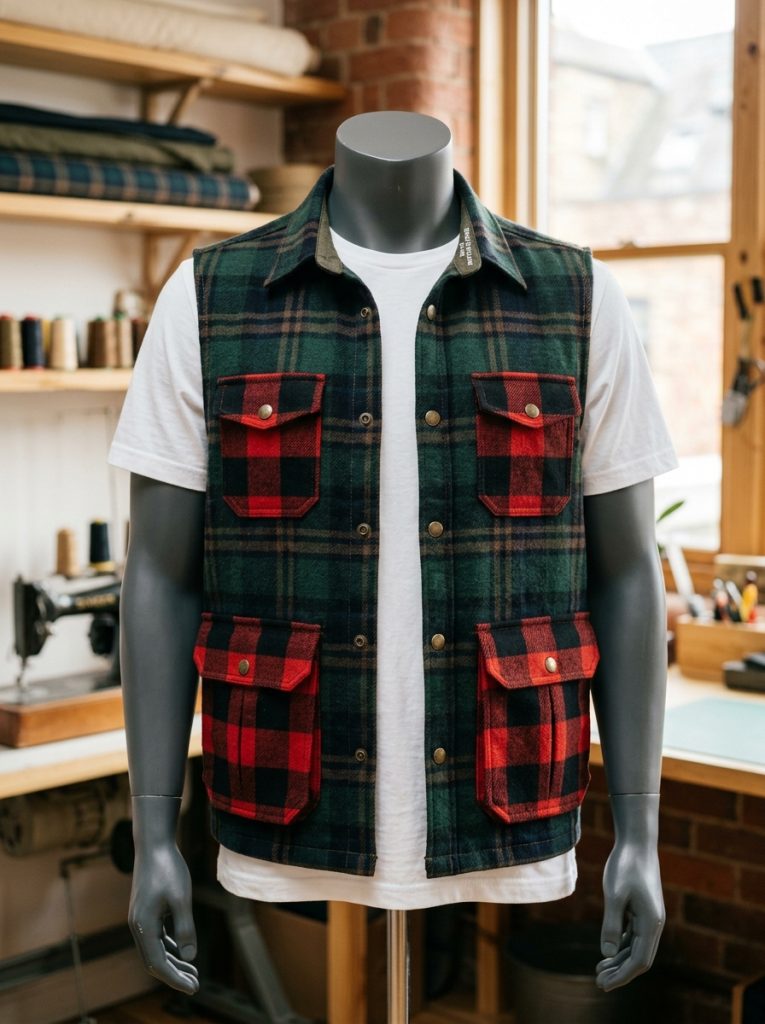
Creating a contrast pocket utility vest involves converting two worn-out plaid flannel shirts into a single structured, multi-pocket sleeveless layering piece. Begin by laying a heavy plaid shirt flat and cleanly trimming away both sleeves along the shoulder seams, folding the raw edges inward half an inch and stitching a neat hem. Cut out large rectangular fabric panels from a second contrasting flannel shirt to serve as functional chest and hip cargo pockets. Fold the top edge of each rectangular pocket piece down to create a reinforced hem, then pin the pockets symmetrically onto the front panels of the sleeveless vest base. Stitch the sides and bottom edges of each pocket securely to the vest using a double line of straight stitching for structural reinforcement. Finish the garment by reinforcing the front button placket and adding small metal snap fasteners to the new pocket flaps for secure storage.
3. Patchwork Denim Graphic Band Tee
Setup Method
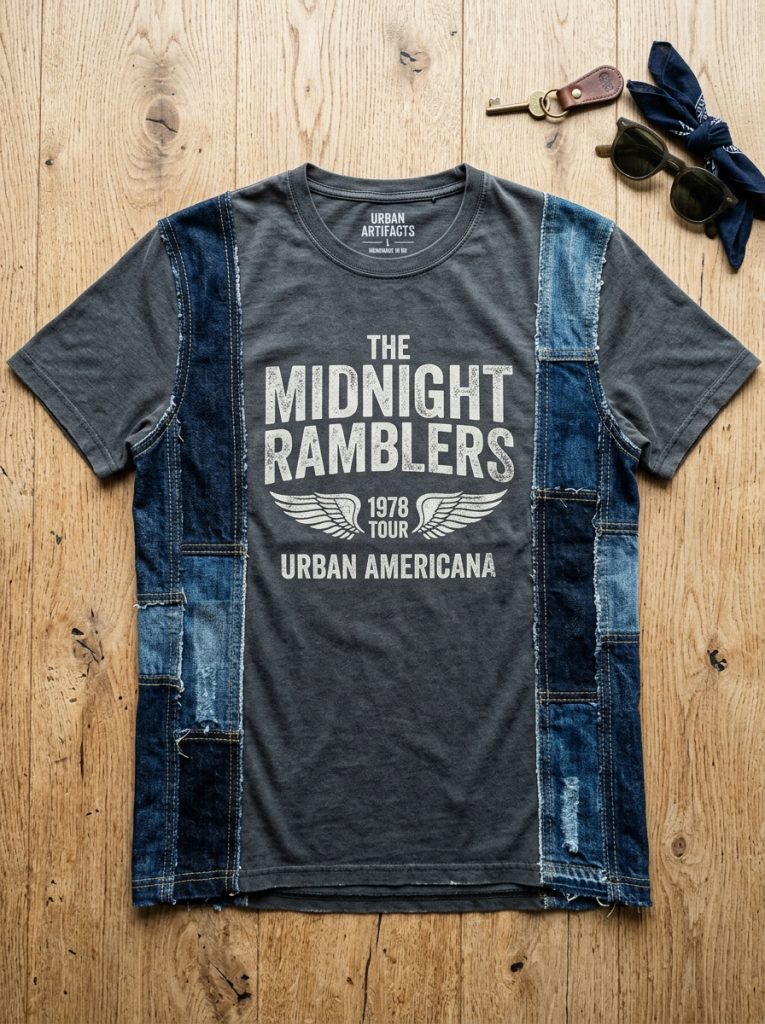
The patchwork denim graphic band tee integrates structured denim panels into a relaxed cotton t-shirt to add texture, weight, and visual contrast. Select a fitted graphic tee and cut out a rectangular center section surrounding the front print, taking care to keep the cuts square and clean. Source two coordinating denim fabric scraps from old jeans, trimming them to match the height of the removed t-shirt section while adding a half-inch seam allowance along all sides. Pin the denim side panels to the central graphic cotton piece with right sides together, stitching along the vertical lines to form a unified front chest panel. Reattach the new composite front section to the t-shirt back and shoulder seams, ironing the flat seams open on the interior to prevent bulkiness. Hem the bottom edges neatly using a stretch needle on your sewing machine to maintain the natural elasticity of the cotton knit.
4. Vintage Knit Sweater Beanie and Scarf Set
How to Make
Transforming an oversized vintage knit sweater into a matching beanie and scarf set allows you to repurpose heavy wool or acrylic knits efficiently. Lay the sweater flat and cut across the lower body torso just below the armpits, saving the ribbed bottom hem section to serve as the elastic band for the beanie. Fold the cut torso section inside out, taper the top edge into a smooth curved dome using tailor’s chalk, and sew along the arched chalk line with a tight stretch stitch. Trim away excess fabric beyond the seam, turn the piece right-side out, and fold up the bottom ribbed brim to complete the custom beanie. Take the remaining upper sweater body and sleeves, cut them into wide straight strips, and join the short ends together using flat-felled seams to create a continuous, cozy infinity scarf.

5. Tailored Cargo Pant Shorts with Tool Loop
Practical Setup
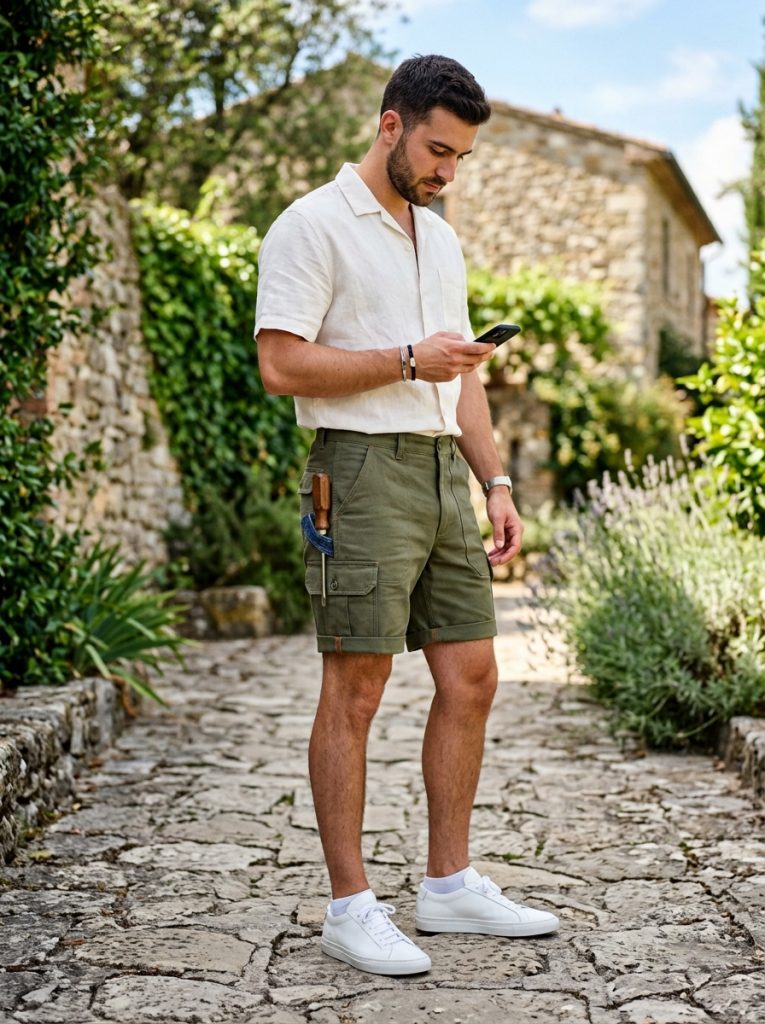
Converting long cargo pants into tailored utility shorts provides a quick way to extend the lifespan of worn-out workwear trousers. Put on the cargo pants and use tailor’s chalk to mark your desired length, ideally two inches below the knee to allow room for a double-turn hem. Remove the trousers, lay them flat on a cutting surface, and use a ruler to draw a straight horizontal line across both pant legs based on your chalk mark. Cut along the lines using sharp fabric shears, saving the discarded lower leg fabric to create custom utility accessories. Fold the raw bottom edges of the new shorts up by one inch twice, press the fold firmly with an iron, and stitch around the circumference using heavy-duty thread. Fabricate a hammer loop from the leftover leg fabric, sewing it securely between the side seam and hip pocket for functional tool storage.
6. Button-Down Shirt Color-Block Camp Collar
How to Create
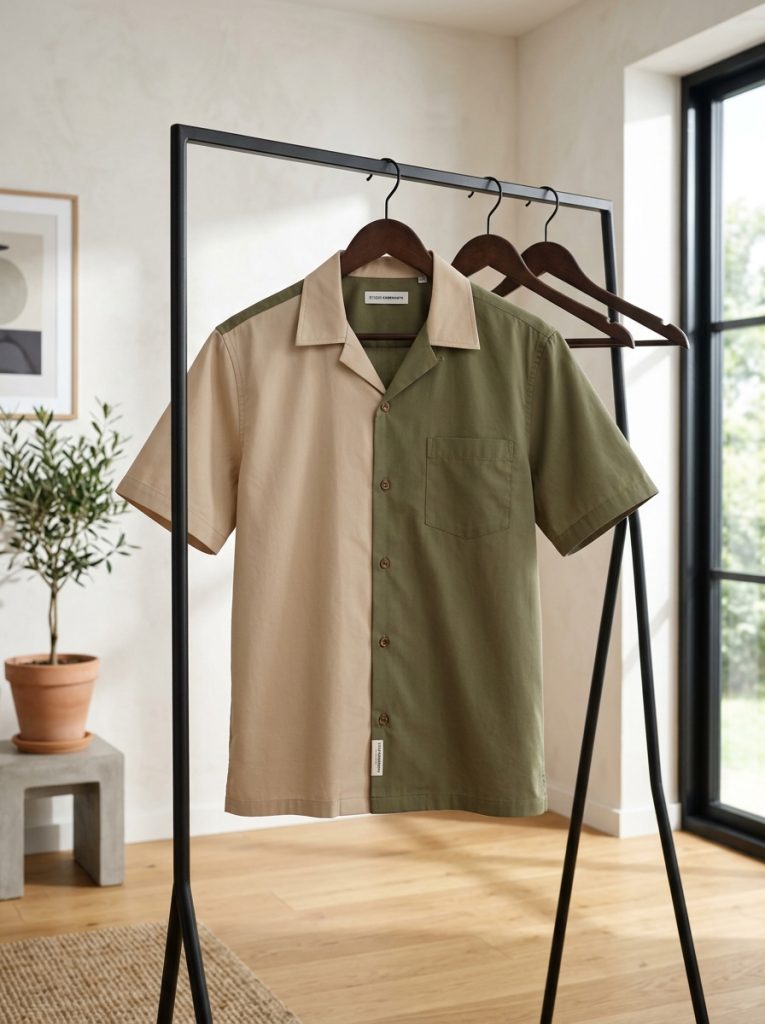
A color-block camp collar shirt synthesizes panels from two different solid-colored cotton dress shirts into a single modern, relaxed summer top. Unpick the collar and front button plackets of two cotton button-down shirts featuring complementary neutral tones like beige and olive green. Cut the front right panel from the beige shirt and the front left panel from the olive shirt, swapping them to establish a sharp, asymmetrical two-tone front torso. Join the newly paired front panels to the back yoke along the original shoulder seams, pinning carefully to maintain equal length across both sides. Fold the standard collar stand flat outward to create a casual, open-style camp collar, pressing the lapels down with a hot iron to set the fold. Stitch along the newly folded collar edges to lock the open collar shape into place permanently, providing a clean, contemporary silhouette.
7. Heavyweight Canvas Work Shirt Tote Bag
Step-by-Step Guide
Converting a rugged canvas work shirt into a heavy-duty tote bag creates a functional carrying accessory complete with built-in front chest pockets. Button the canvas shirt completely, lay it flat on a table, and cut a large rectangle out of the main torso section, removing the sleeves and collar entirely. Turn the fabric rectangle inside out and sew the cut top and bottom edges closed using a reinforced straight stitch, leaving the side seams intact to form the bag pouch. Cut two long, uniform two-inch-wide strips from the discarded canvas sleeves to serve as sturdy shoulder straps for the tote. Fold each strap strip in half lengthwise, sew down the open side, and turn them right-side out before ironing them flat for maximum comfort. Securely attach the ends of the canvas straps to the interior top rim of the bag using a cross-stitch box pattern for weight-bearing strength.

8. Ribbed Cuff Sweatpants from Oversized Hoodie
Execution Process
Creating ribbed cuff lounge shorts or sweatpants from an oversized fleece hoodie repurposes soft knit fabric into comfortable home loungewear. Lay the hoodie flat and cut off the hood, sleeves, and top chest section just below the armpits to isolate the main fleece torso tube. Cut down the center of both side seams to divide the lower torso into two equal front and back fleece panels. Fold each panel in half lengthwise, mark a curved crotch seam using a pair of existing sweatpants as a pattern template, and cut along the template lines. Pin the front and back crotch seams together, stitch them securely, and join the inner leg seams using a flexible stretch stitch to form the pants structure. Fold the top waist edge over a wide elastic band, stitch the waistband casing closed, and reattach the original ribbed cuffs from the hoodie sleeves to the leg openings.

9. Thermal Hen-ley Sleeve Color-Shift Crewneck
Setup Method
The thermal henley sleeve crewneck merges the textured waffle-knit arms of a henley top with the smooth body of a plain crewneck sweatshirt. Carefully remove the sleeves from both garments using a seam ripper to isolate the armhole construction without tearing the knit fibers. Position the waffle-knit thermal sleeves into the armhole openings of the crewneck sweatshirt base, aligning the underarm seams precisely to maintain comfortable arm mobility. Pin the curved shoulder seams securely, stretching the waffle fabric slightly if necessary to match the circumference of the sweatshirt armhole opening. Sew around the armhole using an overlock stitch or a dense zigzag stitch on a standard machine to allow the join to stretch during wear. Finish the project by pressing the interior seam allowances toward the body of the sweater with an iron, creating a smooth interior fit that prevents skin irritation along the shoulders.

10. Denim Scrap Patchwork Apron
How to Make
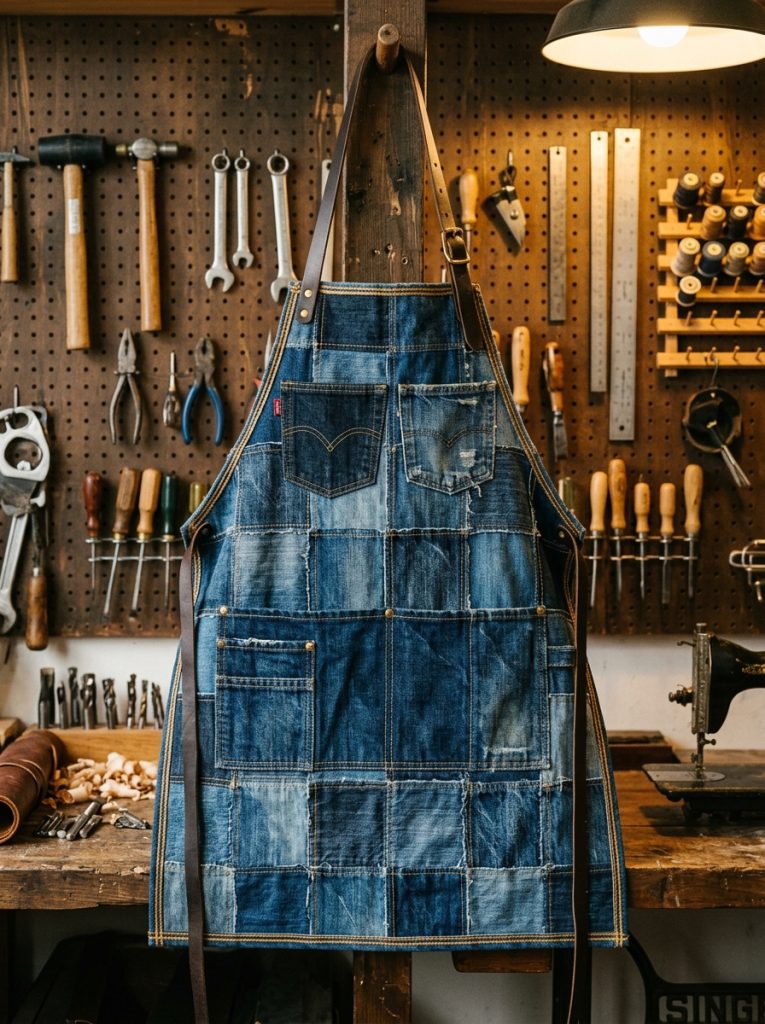
A denim scrap patchwork apron utilizes leftover fabric scraps from old jeans to construct a durable, full-coverage workshop or kitchen apron. Cut various rectangular and square denim pieces from multiple pairs of old jeans, organizing them into a pleasing grid layout measuring twenty-four inches wide by thirty-six inches tall. Stitch the denim scraps together row by row, pressing all flat seams open on the back side as you build the unified patchwork fabric sheet. Trim the top third of the patchwork sheet inward on both sides to form a tapered bib section that covers the chest comfortably. Hem all outer raw edges around the apron perimeter with a double-fold hem using heavy-duty golden thread to match traditional denim styling. Reconstruct chest storage pockets by sewing salvaged back pockets from old jeans onto the front bib, then attach long cotton webbing straps to the waist and neck loop.
Common Beginner Mistakes and How to Avoid Them
Unintended fabric distortion and improper seam matching represent two of the most common mistakes beginners encounter during clothing upcycling projects. Working with mixed fabric types, such as joining a non-stretch woven denim to a flexible cotton knit, often leads to puckering along the seam lines if the fabrics are pulled unevenly during sewing. To prevent this issue, use a walking foot attachment on your sewing machine and pin seams every two inches before stitching. Another frequent error is cutting garments without leaving an adequate seam allowance, resulting in finished items that fit tighter than originally intended. Always add a half-inch to three-quarters of an inch beyond your desired final dimensions when marking cut lines with tailor’s chalk. Finally, avoid skipping the iron; pressing every seam flat immediately after stitching dramatically improves the structural appearance and overall quality of your handmade garments.
Practical Tips for Better Results
Achieving professional, long-lasting results in upcycled menswear requires careful attention to thread choice, needle selection, and finishing techniques. Always select thread that matches the weight and composition of your primary fabric; heavy cotton canvas and denim require heavy-duty polyester or topstitching thread, while knits require flexible all-purpose thread. Use ballpoint needles when sewing sweater knits or t-shirt jersey to avoid cutting through the yarn loops, and switch to sharp denim needles when working through thick denim seams. Take advantage of existing garment features, such as original finished hems, button plackets, and functional pockets, to save time and give your project a polished look. Trim all loose threads cleanly after completing each seam, and finish raw internal edges with a zigzag or serged stitch to prevent fraying during future washing cycles.
Styling, Presentation, or Organization Ideas
Styling upcycled menswear effectively relies on balancing casual remade elements with clean, classic wardrobe staples for a well-rounded outfit presentation. Pair bold upcycled pieces, such as a color-blocked camp collar shirt or a denim hybrid jacket, with simple neutral trousers or dark chinos to keep the focal point on the custom garment. When organizing your upcycling workspace, group raw materials and fabric scraps by weight and fiber type in clear storage bins to streamline future project planning. Store delicate handmade items on padded hangers, and fold heavy knit beanies and reworked fleece lounge pieces neatly in drawers to preserve their elasticity and shape. Presenting upcycled items cleanly by pressing them thoroughly before wear highlights the crisp craftsmanship and structural details, elevating the overall aesthetic appeal of your custom handmade collection.
Budget or Time Planning
Upcycling menswear is an exceptionally economical hobby that requires minimal financial layout while delivering high-value personal style upgrades. Sourcing donor garments from your own closet, family hand-me-downs, or local thrift stores keeps material costs negligible, often spending only a few dollars per project on thread or replacement elastic. From a time planning perspective, smaller accessories like knit beanies, tote bags, or hemmed cargo shorts can be completed in one to two hours of focused crafting. Intermediate structural redesigns, such as the fleece-sleeve denim jacket hybrid or color-blocked shirts, typically require three to five hours from layout to final pressing. Planning your projects in distinct phases—sorting and cutting on one day, followed by pin assembly and sewing on the next—prevents fatigue, ensures precise execution, and keeps the creative process enjoyable and rewarding.
Creative Expansion and Advanced Inspiration
Once you feel confident with basic upcycling methods, advanced textile manipulation techniques can take your reconstructed Menswear to the next level. Experiment with fabric dye processes, such as dip-dyeing or acid-washing, to unify mismatched fabric panels before reassembling your upcycled garments. Explore traditional Japanese sashiko embroidery to reinforce distressed denim joints with decorative functional stitching, adding visual interest while strengthening high-wear areas like knees and elbows. You can also scale your upcycling skills by combining three or four distinct donor garments into complex outerwear pieces, such as a full-length patchwork trench coat or a insulated utility jacket. Designing custom patterns on paper based on your favorite commercial fits allows you to cut upcycled fabrics with complete accuracy, turning discarded textiles into a truly tailored, high-end handmade wardrobe collection.